Saturday, November 12, 2011

Inspiration from the Blogosphere!

I found this fabulous tutorial over on the Simple Stories blog and wanted to share it here with all of you.


An Envelope Tutorial


Today I'm going to show you how to make your own envelopes for cards or hidden journaling on your layouts. Sure you can buy fancy envelopes, but do they match the Simple Stories lines? I don't think so. But now you'll know how to make your own, our sample is 3.5" x 6". You can make them smaller or a bit bigger using one 12" x 12" sheet. I'm using the new Year•o•graphy line for this tutorial.


1. Cut an 8" x 9" rectangle and mark out the following measurements:
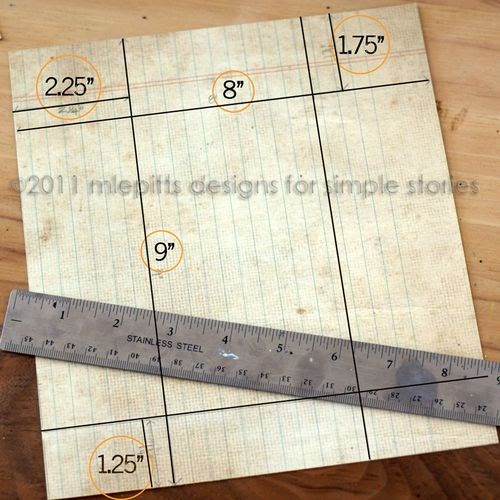

2. Cut out the corners:


3. Trim just a bit off the edges, note how the greyed rectangle in the above image is just a bit larger on the edge? Trim the one edge a bit more, as shown below, this will make the folding much easier.


4. Score and fold.


5. Fold the two sides in, draw a slight curve on the top side of the envelope and cut it out.


6. Do the same for the top and bottom flaps. You can use a corner rounder for this step as well.


7. Glue the center and bottom flap.


8. Let dry.


9. Punch 2 circles, I used a 3/4" punch. Add a brad to the center of each circle, apply a pop dot to the back of each circle.


10. Attach the circles to the flap and the back of the envelope. Wrap with a bit of twine to hold it closed.


11. Decorate as desired, and you are finished. Now you have a custom made envelope to match the line you are working with. Pretty cool, huh?


Supplies:
Year•o•graphy Fundamental Cardstock Stickers
Year•o•graphy Expression Cardstock Stickers
Year•o•graphy Green/Notebook
Year•o•graphy Red/Mini Calendar
OTHER: The Twinery twine in Cappuccino, Brads, Scotch Quick Dry Liquid Adhesive

Friday, November 11, 2011

Lest We Forget


Take a moment on this very important day and say a prayer or send a positive thought to our Armed Forces past, present and future.

We need to remember always the sacrifices many have made to give us the life we have today.


Tuesday, November 8, 2011

Kit of the Week!

A new week means a fabulous new "Quic-Kit" from ladies of Fruit & Nut!  This week's kit uses the gorgeous Lost & Found Two collection from My Mind's Eye.


Get yours today while quantities last!

Monday, November 7, 2011

Design Team Monday!

Our Product of the Month for November is the amazing On Display Embellish Me frames from Fancy Pants Designs!!

These innovative and unique frames are ideal for showing off your projects and are easily embellished! With a flexible center, you can use it as a scrapbook page . . . add papers, ribbon, buttons, stitching and more for your own creative look and decorate your house with memories!

There are two different sizes in stock.

The 6x8 frame is available in both black & white for the low price of $5.00.

The 18x9 frame is available in white for the love price of $10.00.

With Christmas coming up these would make a beautiful gift for anyone on your list.

Here is a video from Scrapbook.com with more information about these fantastic frames.


And now let's check out what the team did with them.....
_________________________________________________

Michele

Here is my frame. I so enjoyed working with this!! I love the transparency!!!! I took 3 pictures to show you how you can see right through!! This is why, while I'm still a beginner, I decided on quilling. It accentuates the transparency effect.

Rub-Ons stick really well to the plastic!! You can pierce the plastic, I mean, the sky is the limit as to what you can do with these frames!!! And they will match any decor by picking up the wall colour!!


Supplies:
Fancy Pants On Display Frame
Brown-beige card stock for the matting
Quilling pre-cut paper strips
Old Rub-Ons (the butterfly is also a Rub-On) and
18 I-Rock tiny gems 
_________________________________

Tracey

I first saw these frames back in April at ScrapFest Kitchener and I so fell in love with the samples Fancy Pants provided for the Turtle booth that I picked up a few of them! I brought them home and they have been sitting here ever since. This month was the perfect excuse to bring them out.

The first one I did uses my kit for this month and shows you that you don't have to stick to the intended theme of collections. This Christmas collection worked perfectly for this project as long as I was choosy about which patterns I used!


Supplies:
Fancy Pants On Display Frame
Bella Blvd Christmas Wishes collection
Maya Road Bottle Cap
My Little Shoebox Mini Alpha Stickers & Word Sticker
Maya Road Rose Ribbon trim
Border punch (scallop)
The Twinery twine
Miscellaneous button


The second one I made as a gift for the store and uses a Fancy pants collection from my stash. Totally fitting because with Lori & Hannah in the picture are the super fabulous, sweet and talented owners of Fancy Pants - Jodi & Jared Sanford. 


Supplies:
Fancy Pants On Display Frame
Fancy Pants It's the Little Things Collection
Fancy Pants Filter Flower Embellishments
The Twinery twine
Border Punch (scallop) 
______________________________________

Julie

I decided not to use a photo for this project. One of my collections for Christmas is trees, so this can be used as a decoration for my tree display.


Products used:
Fancy Pants On Display Frame
Stickles
BoBunny Father Christmas papers
Liquid Pearls
Misc chipboard trees and title
Misc rub-ons

Thursday, November 3, 2011

November Promotions Flyer


Click on the flyer to see it bigger.


Promotions valid only during time period specified, no exceptions.

Promotions not to be combined with other offers, discounts or coupons.


Printed flyers are available for pick-up at the store.


DT Special Assignment Day!

Using Moulding Paste

By Julie Gillespie

I've been wanting to try this technique for a while so decided that there is no time like the present! You are going to be doing this tutorial right along with me as I experiment....I'm going to be using Moulding Paste in 4 different ways to show you how to add some texture to your projects. Moulding Paste is great because there are a number of different effects that you can get with it...and you can use so many of your current supplies with it as well. This is definitely a "messy" project, not for the faint of scrapbooking heart , but I hope you'll give it a try. I know that I will be trying more of these, so watch for more examples in my upcoming projects. (See also my October "extra" challenge layout. I used gesso on this one with a stencil. I found the gesso was a bit thinner texture than the moulding paste...I think I like the moulding paste better.

My favourite is the last one...but I have lots more stencils and stamps and ideas, so I think I will enjoy playing and experimenting with this medium some more.

Don't forget to thoroughly clean your stamps and stencils before the gesso or moulding paste dries on them.

I'm going to show the 4 techniques in order of steps.

Technique 1:  Smear some paste across your paper. Spread it in different directions so that you will get different areas of texture. I used an old credit card to do this.


Technique 2: Lay a stencil on your paper and smear some paste across the design. Carefully lift the stencil, leaving the raised design intact. If you only want to use part of a stencil you can cover the other sections with paper.


Technique 3: Smear some paste on your paper. Press a rubber or acrylic stamp into the wet paste to imprint the design. (You can also use other things to create texture...think burlap or wire mesh.)


Technique 4: Smear some paste directly onto your rubber or acrylic stamp and press onto the paper to "stamp" your design. (not shown)

Let these dry overnight on their own, or gently dry it with your heat gun.

Technique 1-4: Rub inks across your paper and paste areas to achieve the effect and colours you want. OR Spray your paper and stencilled image with Glimmer Mist Take a slighly damp cloth and rub over the paste areas to remove part of the ink. Ink and mist until you are satisfied with the result. 


Add embellishments of your choice to finish the project. I used rub-ons (found it a bit difficult on the paste areas, but it could have been the rub-on brand rather than the technique)

I also stamped the same image on the card where I stamped into the paste.


Tuesday, November 1, 2011

Kit of the Week!

We hope everyone had a safe and Happy Halloween!!

This week's "Quic-Kit" is perfect for scrapping the pictures of your ghosts and ghouls!


Get yours today!