Showing posts with label The Twinery. Show all posts

Saturday, March 17, 2012

Spring Butterflies with The Twinery

I came across this fabulous tutorial on The Twinery blog.
  How adorable are these butterflies?!?!

Spring Butterflies


As you can see from this card, I made a multi-colored butterfly by following the steps I've shown below but also adding a 2nd color to the fork before tying the twine and taking it off the fork.

Here is how I made the butterflies:


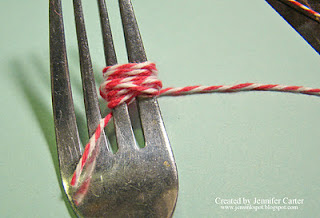
First, wrap as much twine around a fork as you'd like. The more twine you use the fuller your butterfly will be. For the size of butterflies I made on the frame, I wrapped the twine around all four tines on the fork. In order to tie the butterflies evenly at the end, it is best to wrap around an even number of tines.


After you've finished wrapping, you will want to take a contrasting color of twine and wrap around the center tine twice and tie. You will want the knot centered at the top of the butterfly. Be sure to pull tight. Once you tie your knot this piece will also become your butterfly's antennas.


This is what the butterfly looks like after you've taken it off the fork.


The last step is to trim the antennas to the size you would like them to be.


If you want to make the smallest butterflies, I wrapped the twine around only 2 tines and then completed the steps above.


Thanks for the inspiration Jennifer!!

Pop into the store today to get some of these yummy twine and make some of these sweet butterflies for your next project!

Saturday, September 10, 2011

Inspiration from the Blogosphere.....

I am always on the lookout for ideas to put my fabulous twine from The Twinery to use.  It is one of my favourite finishing touches on my projects!!

I came across this tutorial on The Twinery's blog and had to share it here!


Twine Pansy Tutorial


Step 1: Choose your favorite Twinery shade...our NEW favorite is their Honeydew!!!
Be sure to cut a large enough piece of twine - I find if you wrap the twine around the item at least 4 times, that's usually plenty.


Step 2: Start as if you were wrapping a gift, wrapping the twine around the middle, then crossing it on the back, continuing around the opposite sides to meet in the front again.


Step 3: When meeting the two ends in the front, tuck them under the twine that lays vertically across the middle...see photo.

Step 4: Tie a simple "half" square knot & pull tight.


Step 5: Tie a standard bow pulling tight to secure loops.

Step 6: Repeat Step 5 two more times but this time be careful not to pull too tightly (which will unravel the previous bows).


Step 7: Trim ends and VOILA, there you have it. A sweet little package that's Pretty as a Pansy!
________________________________________

Want to try your hand at making your own?!?! 

Pop into the store to pick up some of this yummy twine!


Saturday, September 3, 2011

Inspiration from the Blogosphere.......

Here is another fabulous tutorial I found in the blogging world.  I don't know about you but I love my twine from The Twinery and I use it a lot but my bows are kind of inconsistent.  Well, no more, check out this fabulous idea I found.....

By the way, The Twinery's yummy baker's twine is available at Scrapping Turtle
It comes in several delicious colours!
_____________________________________

Tying a Perfect Twine Bow


Today I am going to show you a quick tip for tying a perfect bow using a special tool...from your kitchen.

Go grab a fork and some twine and let's get started!

{I am using Pink Sorbet twine}


Step 1:  Lay your fork down on a stable surface with a strand of twine behind it.

Step 2:  Wrap the twine on the right side of the fork over the top of the fork.

Step 3:  Wrap the twine from the left side of the fork (the twine that is still underneath the fork) over the other portion of twine. Thread it through the opening between the middle tines of the fork.

Step 4:  Pull both ends of the twine so it is snug against the fork.

Step 5:  Take the end of the twine from behind the fork and bring it through the top of the opening between the middle tines of the fork.

Step 6:  Tie the two ends of twine together and pull tight to secure the bow.

Step 7:  Remove your bow from the fork and add that cute little bow to your project!

{You can also use this method of tying a bow with ribbon, just be sure to keep the ribbon flat and untwisted as you work to get a beautiful finished product.}

I used this technique for tying a twine bow with The Twinery's Lilac twine on this card: