Saturday, May 21, 2011

Happy Victoria Day!

From the Turtle family to all of yours, we hope you have a fabulous Victoria Day weekend!


Just a reminder that the store is OPEN on Monday so come on down and visit us!

Friday, May 20, 2011

100 Days of Summer


Doesn't that sound nice right about now?!?!  At this point I think I would take 1 day of summer!!!

Anyway, I know that fabulous sunny weather will be on its way soon and when it gets here, we have the perfect collection for scrapping those 'fun in the sun' memories!!


100 Days of Summer from Simple Stories is now on our shelves and soon to be online!!


Thursday, May 19, 2011

DT Special Assignment Day!

Thursday means another DT Special Assignment.  Today's is brought to you by Jenn.


We've had some WONDERFUL tutorials from our DT this term, but I wanted to switch things up a little. So, for your reading pleasure I've written an article about my take on the importance of journalling!


Beyond the Words and Pictures

====================

A journal is typically defined as a daily record of occurences, experiences and observations which may, or may not be specific group, society or profession. Journalling could therefore be defined as the action of recording the occurence, experience or observation.

In the scrapbooking world, most people journal their work for those exact reasons. They want to commemorate and/or capture the specifics of the events, experiences and observations of the memories they are preserving. Usually journalling on a scrapbook page will identify dates, people in the pictures and what the event was in the picture; these details are important and wonderful for preservation of these details. For some pages, just these basic details are all that are needed or all that a scrapbooker wants to include.

However, creativity more often than not, flows from the artist's canvas of paper, ribbon and embellishments, into the words and/or way the words are presented in the journalling. Some people create poems to serve as their journal, others write a story or narrative of the details they want to capture and some just use creative words to vividly describe the memory they have captured.

Not only is the style of writing part of the creativity, but the presentation of the journalling can be just as adventurous and creative. You may choose a journalling block, pre-printed or self stamped, and write all the details by hand. Exploring different font in hand writing can also add character to the journalling. Some people, particularily those with a very "neat and tidy" style, prefer to print it on a computer and add it to the page in a more formal way. Making the journalling more whimsical and less structured can add fun and vibrancy to story as well as the piece of art itself.

Although the words in journalling capture the details of what you want to remember, which is very important, your journalling is also be beyond the words you have written. The words which you use to describe the event, occurence and experience, coupled with the creativity of the journalling presentation show who you are and what's important to you. Both are essentials to good journalling and good scrapbooking in general.

Scrapbooking is most definitely a great way to preserve your memories, but it also a very effective way to express yourself as a person. As a scrapbooker you want to achieve both the preservation and the expression. If these weren't important, you wouldn't be putting all the time and effort that you do into the pages you create. For these reasons, always remember that the journalling is just as important as the pictures and paper you choose for your masterpiece.

So take that few moments to include some journalling no matter how short or long you choose to make it. Have fun with it, be creative and remember to make the words your canvas too!


Wednesday, May 18, 2011

Your Next Stamp now at the Turtle

Your Next Stamp rubber is now available at Scrapping Turtle!  This is a fabulous Kitchener-based business with lots of adorable images!  Be sure to stop in today and check them out!!

Below are a couple of samples using their stamps.....


 Created by Simonne Clay.  Stamp used is Fetch the Dog.


Created by YNS DT member Maureen Wong. Stamp used is Ellie Loves Music.


Created by YNS DT member Kerri Michaud. Stamp used is Chompy.

Tuesday, May 17, 2011

Kit of the Week!

A new week means a new "Quic-Kit"!  I think the ladies of Fruit & Nuts just continue to outdo themselves.  They have another gorgeous kit this week!

Quantities are limited so get yours today!!

Monday, May 16, 2011

Design Team Monday!

Monday is here again and that means the team is back for another round of reveals.  This week, is a technique challenge.  It is all about the Embossing!

Julie


Here is a sample of using an embossing folder on cardstock and then highlighting the raised images with ink


This closeup shows an example of using heat embossing on the flag banner. The cardstock was inked and then covered with embossing powder. Using a heat gun to melt the powder gave a shiny silver finish.


Products used for "Stars" layout include:
Bazzil Basics Paper Half the Edge cardstock strips
pom pom trim
BoBunny chipboard circle
Misc letters, small gems and cardstock

__________________________________________

Cherie


Embossed chipboard title:


Cardstock: Bazzill
Chipboard: Best Creations
Die Cuts: Jillibean Soup
Letter Stickers: Basic Grey
Chipboard Title: Maya Road

__________________________________________

Michele

I love embossing!! Since we are featuring just that this week, I used both my Big Shot and my heat gun! I embossed and double embossed several pieces on this LO to show you the different things you can do with both heat and cold embossing and the 2 combined.


Here are detailed photos to better see the embossing. Note here that the background paper (the little bunnies) is already embossed by Best Creations. 


Material Used:
Paper: Best Creations Bunny Love collection and white-pink cardstock
Inks: White, pink and blue pigment ink, enamel embossing powder, Glossy Accent and Crackled Accent
Other: Embossing Folder, EK Success punch
Ornaments: Best Creations chipboards, brads, Bazzill Half The Edge, Bazzill Just the Edge, pompom ribbon, transparent piece and Zva pink bling
__________________________________________

Virginia 


It is difficult to see in the photo but I embossed the border around the photo with a border punch that also embosses.

Supply list:
Patterned paper - Safari Girl by Best Creation
Cardstock - Bo Bunny
Letter Stickers - October Afternoon

____________________________________________

Jenn


I embossed the green card stock on the backgroud of the pictures using a cuttlebug embossing folder. Then I used ink and lightly brushed it over the raised part of embossing. To add a little more definition to the embossed area, I traced the embossing with my Sakura glitter pen.

Products used:
Cuttlebug Embossing Folder
Sakura Glitter Pen
Tim Holtz Distressing Ink - Shabby Shutters
Bazzill Half the Edge - Pink
Pom Pom Trim
Bazzill Card Stock

Sunday, May 15, 2011

DT Special Assignment Day!

I am finally here with last week's special assignment!  These Blogger issues were making me crazy!!  This is not my main blog so of course Blogger would not let me sign out of mine and sign into this one.  It was making me a little NUTS!!!  Anyway, I am here now so let's get on with it.

This week's tutorial is from Michele and she is going to show you how to make some super fabulous Milk Carts.


The milk cart; good for any occasions. It makes a really nice gift for all ages. And it’s actually very easy to do. I’m slow; I like to take my time. And I made these 4 milk carts, including decorating and taking half of these pictures, all in one afternoon. Try it, it’s fun!! And you are bound to make someone, on the receiving end, very happy!

Ingredients:
One 12x12 card stock or any sturdy paper
Four 6cm x 11cm (2.3 inch x 4.25 inch) leftover papers and whatever to decorate a bit
One 28cm (11 inch) piece of ribbon
Four eyelets (optional)
Glue

First, start with a 12x12 cardstock, or any paper, but choose one that is sturdy, not flimsy. Measure where your folding lines and cutting lines will be. I drew thick lines across mine to make it clear for you but you could just mark with tiny dots.

2 cm = 0.8 inch
4 cm = 1.6 inch
7 cm = 2.75 inch
12 cm = 4.75 inch


Now cut the excess off and you have something like this. Mark to round the top corners and cut the indentations on the right:


This is it:


Mark four more folding lines (the two triangles):


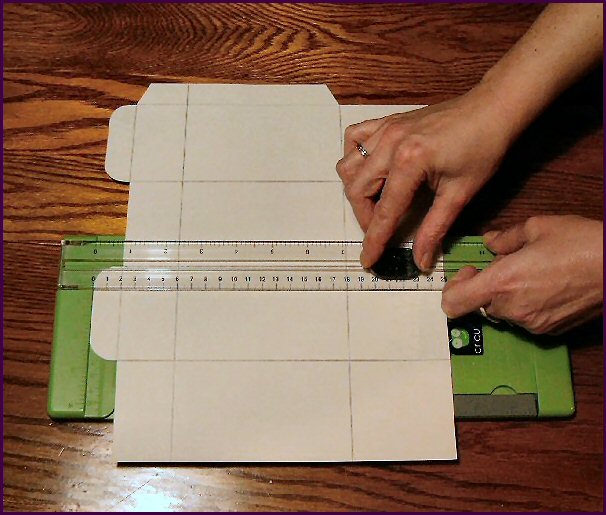
Score along every line:


Erase your marks:


And you have something like this:


Cut on the bottom and also the small part on the top right (that you see well on pics 2 and 3):
(I forgot to cut it earlier!! LOL Sorry, that's why it's light and hand-drawn... so sorry, hehehe)


Now fold every line:


This is what you get:


Mark 2 spots on each tab (center in the same place on both, they will line up when you glue your container together:


Pierce your four holes:


Set in your eyelets (this is optional, just holes will do if you don’t have eyelets):


Don’t glue yet but if you now fold, this is what you get; you’re already seeing your cart:


Now you can decorate as you please. It’s easier to decorate before gluing, this way you can work flat on the table:


If you want an edge going all the way around, unless you use fabric ribbon, I suggest you cut into 4 pieces (instead of one long piece); this way it will fold better in the end.


Once you have finished decorating, you are ready to glue your container. Start on the bottom:


Bring your four flaps together one by one:


Like this:


Now you can glue the side:


And the top part:


Cut a ribbon (about 11 inches) and before you close the container with it, fill with goodies of course, here I have Easter chocolates but you could put anything in here, hot chocolate, what not:


And tada!! This is the finished product.


Notes:

I placed the chocolates in a plastic bag that went in the Milk Carts... What if the chocolate melts...)

And of course, the dimensions can be changed to fit any need!!

I used papers and stickers from the beautiful Best Creations' Bunny Love collection to decorate my milk carts.