Showing posts with label Technique Challenge. Show all posts

Thursday, December 22, 2011

Design Team Mon...er....Thursday!


Yeah, it's not Monday anymore.  In fact, the week is just about done.  Blame it on the busy season, I guess.  I had every intention of creating this post on Monday but while I wasn't looking the week passed me by and now it is Thursday.  Well, here it is for your enjoyment now!  :)


For this month's Technique Challenge we are going to work with our Product of the Month - Ranger Accents. We are adding paper pieced elements to our layouts and then using the Accents to highlight them further!
__________________________________

Michele

Paper piecing is so much fun to do. There are all kinds of designs on the internet but you can also use colouring pages like I did here. I included the image if you want to try this swallow, it is easy to do, it only has 11 pieces. And covering it with Glossy Accent made it so fancy!!


Of course I had to use Crackled Accent on the clock... I know not all old clocks are broken but it looks so great with that medium, I just can't help myself! lol
 

The keys were fun to do as well; These plastic shapes are designed to be lacquered. They look like they are made of copper because of their colour but really, they are plastic and well designed!! They have a little ring on the leys for example, that you use to hold your piece while you add the Accents on them and once it's dry, you cut off that little ring with scizors. I did a white one last week on my sketch double layout and on this layout, there is a black one made with Enamel Accent and also a clear one made with Glossy Accent.

Paper: TPC Studio - Memory Lane paper collection and Bazzill cardstock
Inks: Coffee Bean Chalk ink and black pigment ink pen
Other mediums: Glossy Accent, Crackle Accent and black Enamel Accent
Ornaments: One TPC Studio - Memory Lane Sticker, a paper clock, 2 plastic keys, black zipper 
_______________________________________

Tracey

For this challenge, I decided to do a different take on the paper piecing thing. I actually used QuicKutz dies and then covered them with these mediums. The heart is covered with Crackle Accents and the apples as well as the words "apple" and "eyes" are covered in Glossy Accents. These mediums work wonderfully with die cuts to help them pop off the page.


Supplies:
Let's Eat collection by TPC Studio
Bazzill cardstock
QuicKutz fonts (License Plate & Moonlight)
QuicKutz dies (ribbon slot & apple)
Jillibean Soup flowers
American Crafts ribbon
Maya Road zipper trim
brads from my stash 
__________________________________

Julie


Products Used:
TPC paper - Winter Whites
Ribbon and felt snowflake
Snowflake brads
Ranger Glossy Accents
Diamond Dust
Maya Road Zipper
Letters - Misc.
Misc. cardstock, doily and pearls

Monday, November 21, 2011

Design Team Monday!

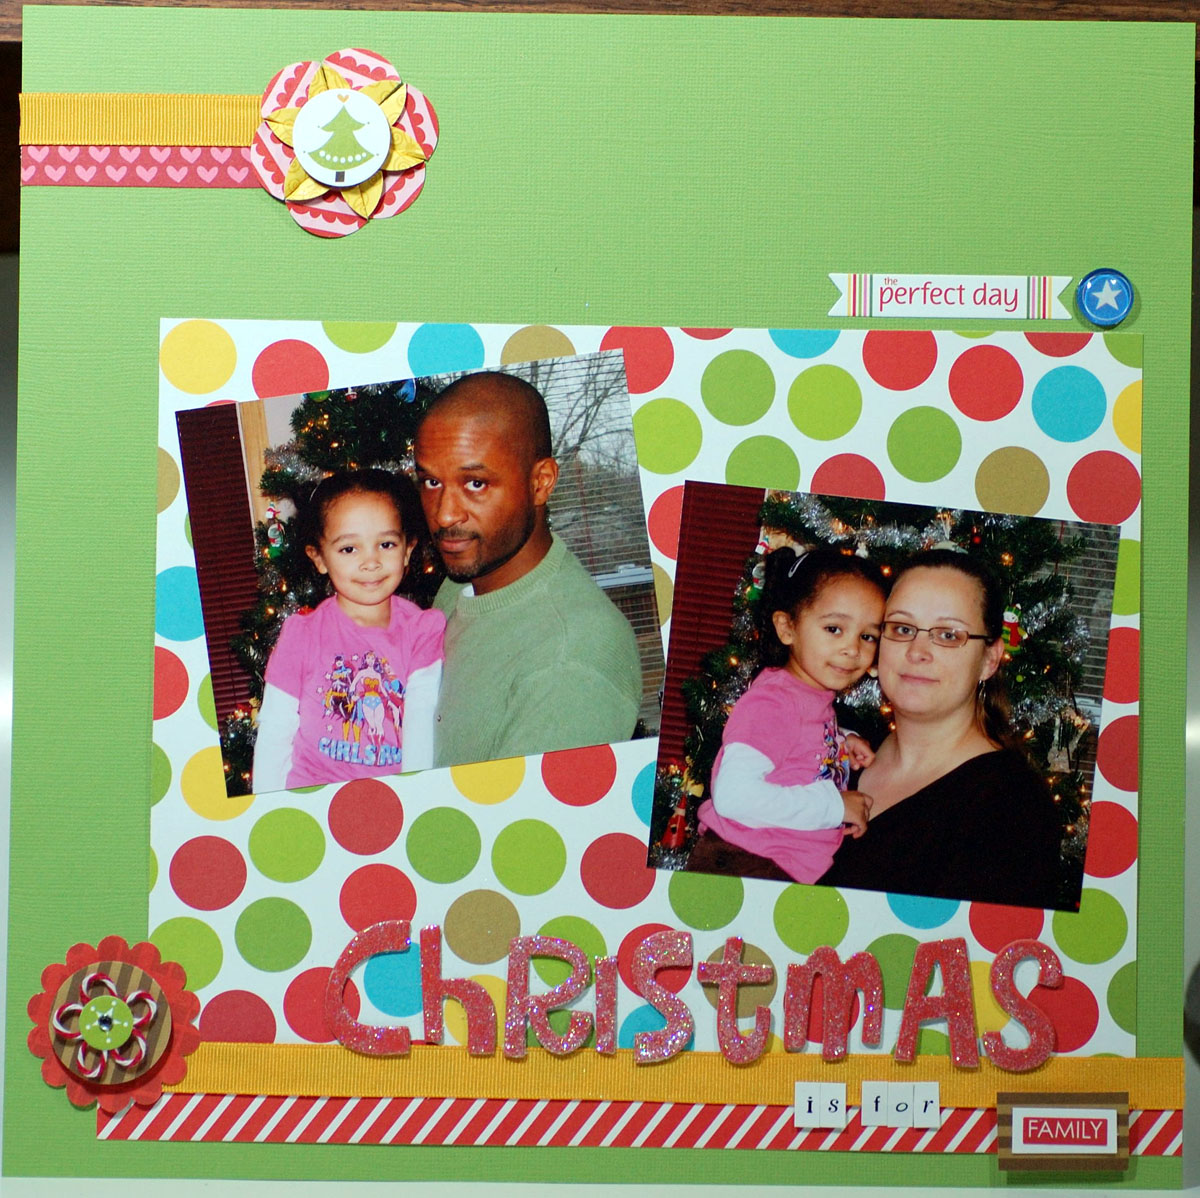
This week the team is offering up a technique challenge.  We want you to use a product for something other than its' original or most-common use.

Tracey

I decided to stick to basics for this challenge. I used basic product on my layout but tried to "think outside my shell" and changed things up a bit.


Supplies:
Bella Blvd Christmas Wishes collection
Bazzill cardstock
Mini Alpha Letters from My Little Shoebox
Dew Drops
Glitter
Maraschino Twine from The Twinery
Gold ribbon

1. Patterned paper is generally expected to be laid down on our layouts. I cut some circles out of mine and made a handmade flower.
2. The red "Christmas" chipboard letters were fabulous as they were but I wanted to add a little extra pop so I covered them in some fine glitter.
3. The "Family" cardstock sticker is generally intended to lay flat on the page but I decided to double matte it and pop it up.
4. The Baker's twine is generally used for knots in buttons or perhaps strung across the page like ribbon but I decided to change things up and make a flower with it.


I hope this helps you see that techniques don't have to be complicated or stressful. Take a technique and stick to the basics with it and you are sure to create some fabulous layouts!
_______________________________

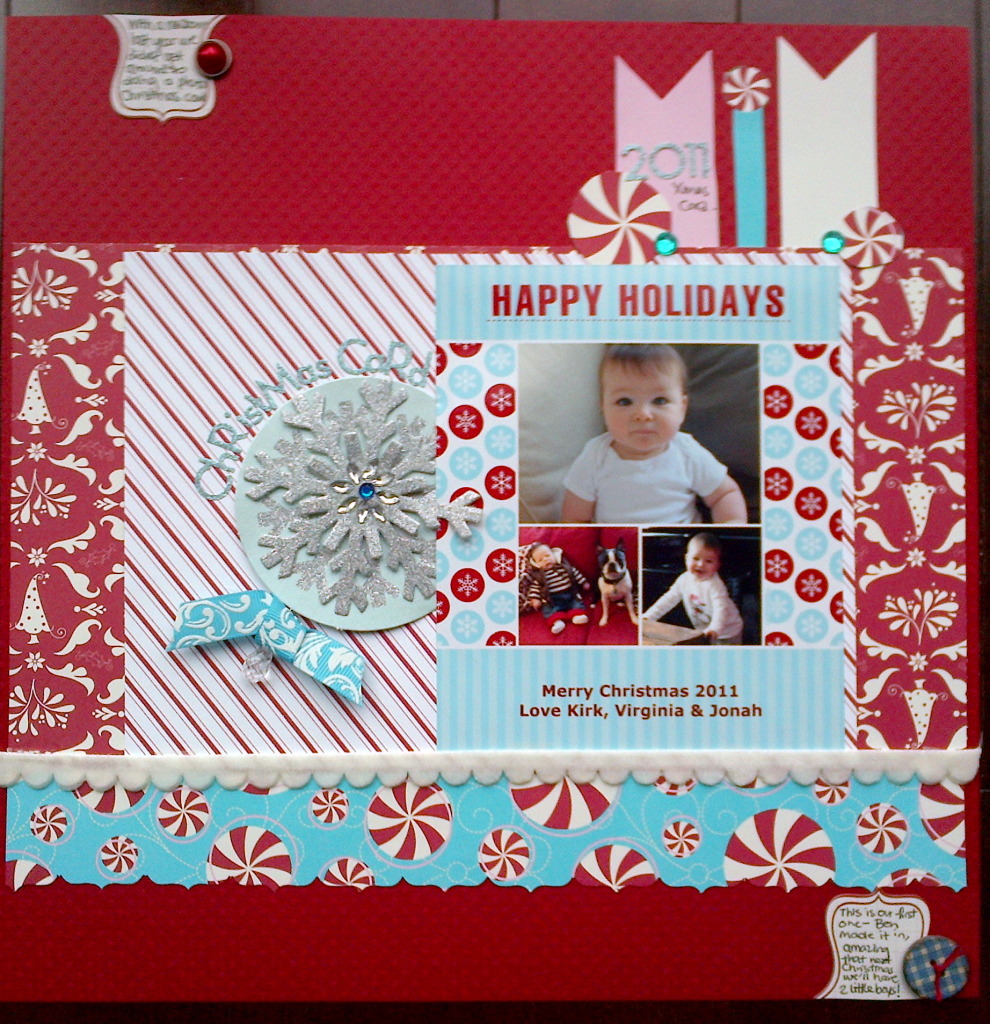
Virginia

I used two elements that are typically not part of a layout to aid in the design.....
1. a Christmas gift tag
2. a Christmas card

Then I also cut the patterned paper along the top out of it's "journalling block" template and used it instead to make a banner of sorts


Supply list:
Bazzill Holiday Style: Patterned Paper
Making Memories: Letter Stickers  
Bazzill Dot cardstock
Maya Road stick pins
Maya Road velvet ribbon 
_____________________________________

Michele

For my part, I had fun making the candy cane with eyelets and ribbon.


Papers: Echo Park - Season's Greetings Collection. Red Bazzill for the die cut
Inks: Brown Cat's Eye chalk ink and white-brown pigment ink pens.
Ornaments: Prima flower vine, Buttons, dew drops and gems, white ribbon and red eyelets, miscellaneous letters.
____________________________________

Julie

I used a Starbucks coffee sleeve, covered it in paper and sealed the bottom to create a pocket for tags.


Products used:
Paper - Echo Park Holly Jolly Christmas
Maya Road pink trim
BoBunny snowflake rub-ons
Misc. Starbucks coffee sleeve

Monday, October 17, 2011

Design Team Monday!

The Design Team is back for another reveal using the gorgeous new Lost & Found Two collections from My Mind's Eye!

Stamping is our technique for this month!! There is so much you can do with stamps and there are so many incredible stamps out there.

A lot of people associate stamps with cardmaking but we are here to show you that you can add the perfect touches to your layouts with them as well!
___________________________________________

Michele

I used Plum Cat's Eye Chalk ink with my Stamp (My Mind's Eye - Lost & Found Two Collection) and I used it repetitively to create more texture and a bit of a frame for the vertical papers (see the word «BEAUTIFUL» here and there on the layout). It's a simple technique that can be quite efficient. You could create an entire frame on the background this way or even around your photo(s).

You can use any colour too. The colour you choose will either make it stand out or be more subtle on your layout.


Papers: My Mind's Eye - Lost & Found Two Collection (Blush)
Inks: Plum Cat's Eye chalk ink and brown and white pens for the hand written text.
Ornaments: Glitter Chipboards, brads, buttons, paper banners and lace ribbon as well as a beautiful frame transparency (over the photo), are ALL from My Mind's Eye - Lost & Found Two Collection, including the stamp!
________________________________

Tracey


The first technique I used was stamping then heat embossing on a button. You have to be careful when stamping because it is very easy to slide on a button.

Tip: When heat embossing, make sure you put a heat resistant tray or trivet down under your button. I learned that the hard way and have the scorch marks in my carpet to prove it. 
 

The second technique is combining stamping & die-cutting. I stamped this banner image then die cut it out.


For the third technique I stamped the heart image and then covered it in Glossy Accents.


Supplies:
My Mind's Eye Lost & Found Two Collection (Breeze)
Fancy Pants Filter Flower Embellishments
Glossy Accents
Seafoam White Embossing Powder
MFT Die-namics
Circle & Scalloped Circle Punches
__________________________________________

Virginia

Here is my take:


I used the My Minds Eye, Lost and Found 2 Rosy stamps and also Studio Calico letter stamps. I am NOT a stamper - it scares me! So for this challenge I stamped on white cardstock then trimmed out the shapes and incorporated into my layout:


You read it right - we're having another baby!

Supplies here are all My Minds Eye Lost and Found 2 Rosy with the exception of the ribbon which was leftover from a gift and the kraft which was a re-used paper bag. 
____________________________________

Julie

I used my stamps to make a border around the 12x12 edge of the page and also to make several embossed flowers on the page.


Products used:
My Mind's Eye Lost and Found 2 papers
My Mind's Eye Lost and Found 2 brads and stamps
Prima flowers coloured with Ranger Ink Stains
Miscellaneous gems


Monday, September 19, 2011

Design Team Monday!

This week, the team is playing with their Crafter's Workshop templates.  If you remember, these are our Product of the Month and are 15% off for the remainder of September.

Virginia

For my technique I used the templates as a template for bling - but I was worried that with just the templates alone you wouldn't be able to tell that it was a leaf design so I first went over the templates with a bit of smooch mist in a colour that was very similar to my cardstock colour.


Supply list:
PP - Bo Bunny Forever Fall
Letter stickers - Sassafrass Lass
Stickers - Basic Grey
Bling - Kaiser
Embelishments - Bo Bunny, American Crafts
Washi Tape - American Crafts
________________________________

Michele

So what do you do with the Crafter's Workshop templates?

We are only showing a few examples here, if you use your imagination, you can get a LOT out of your templates!! In my example here, I wanted to emboss the beautiful swirls from my Capricious Crafter's Workshop template because I wanted them to stand out and to look luxurious. This wild turkey that was in our yard earlier in the season was such a majestic bird, I had never seen one this closely and I wanted to give it justice.

I did not have forest green embossing powder. No problem though because I have super thick CLEAR embossing powder so I used a forest green Cat Eye's pigment ink with the template and with the melted clear powder over it, it gave me exactly what I wanted. I liked it so much that I inked the outer edge of my background with the same dark green pigment ink and added the clear embossing powder to emboss that too!! I had fun!!

So remember, I have been saying this for months with several projects: stock up on white and clear items, they always help get you out of a bind when you don't have the right colour!!


Papers: Bo Bunny - Welcome Home Collection
Featuring the Crafter's Workshop template - Capricious
Inks: Copics for the photo frame, brown and white pigment ink pens for the text, forest green pigment ink for embossing with clear thick embossing powder
Ornaments: 4 Bo Bunny - Welcome Home collection Chipboards, alphabets, flowers and a brad, leaf and ribbon
________________________________

Julie

I used my Crafter's Workshop Template to create a background on black cardstock. I sprayed it with copper Glimmer Mist (it came out a bit uneven, but I kind of liked the look of it). Then I used a white gelly roll pen to draw some zentangles in a few of the diamonds. I also used the template to cut a few pieces of paper to add to the diamond pattern.


Products used:
Bo Bunny Father Christmas papers
Bo Bunny Father Christmas die cuts
Crafter's Workshop template - Harlequin
Ranger inks, white gelly roll pen and copper Glimmer Mist
Misc: black cardstock, ribbon, buttons 
__________________________________

Cherie

For my layout, I put the template down on my background in the upper left corner and lower right corner and inked over the template.


Patterned Paper: Bo Bunny Blitzen
Letter Stickers: Doodlebug Design
Die Cut Letters: Quickutz Silhouette
Brad: Bo Bunny
Die Cuts: Bo Bunny & Jillibean Soup

Monday, August 15, 2011

Design Team Monday!

The team has a techniwue challenge for you this week.  The goal is to include a hidden element on your page. This could mean hidden journaling or extra photos or memorabilia or really, whatever you wish! Interpret as you will!
___________________________________

Cherie


Cardstock: Core'dinations
Patterned Paper: Authentique
Envelope: Maya Road
Letters: Jillibean Soup & Doodlebug
___________________________________________

Virginia
 
I did hidden journalling as my hidden element - the Authentique paper worked so well as one of the sheets I received was already folded...kind of contained two sheets in one - so I just snipped it and that's what I used for my journalling area:


This layout photo is a picture of my son and my girlfriends two boys but the journalling I recorded is more about the friendship I have with my girlfriends - I like how it's hidden b/c it doesn't really "go" with the page but it still records how I'm feeling about my girlfriends in the here and now


Supply List:
Authentique Patterned Paper
American Craft Bits Tags
Tim Holtz Tiny Attacher
Thickers Letter Stickers
October Afternoon Sticker
Bazzill Cardstock 
___________________________________

Michele

SEE THE GREEN RIBBON ON TOP?

PULL IT:

Papers: Authentique Paper - Wonder collection and Foundations Bi-Fold paper, Bazzill cardstock
Inks: Green and Brown chalk inks
Ornaments: 2 Maya Road window chipboard, 1 Maya Road Envelope, green ribbon and one eyelet, 3 miscellaneous chipboards 
______________________________________

Julie


Products used:
Authentique paper and pink letters
Maya Road envelope and stick pins
American Crafts Ribbon
Prima floral ribbon
Ranger Distress Inks
Misc flowers and black lettering

Tuesday, July 19, 2011

Design Team Monday (a little late)

For our technique this week, the fabulous DT ladies are playing with the i-rock tool from Imaginisce. This tool is easy to use, lightweight and inexpensive! A scrapper's dream!! Pick one up today and bling up your projects to your heart's content!!

Cherie


Patterned Paper: Bo Bunny Barefoot & Bliss
Stickers: Bo Bunny
Jewels: Imaginisce
Die Cut Circle: Jillibean Soup 
______________________________________________

Julie

I chose to do a mini album because I had so much gorgeous paper left over this month.

Placing the metal studs with the iRock:

Mini cover: 

I added some more studs to the bikini on this tag: 

I used one of the transparencies to hold this tag: 

It's hard not to get carried away adding bling with the iRock!:  

I added one of the plastic keychain embellishments to the final tag and backed it with a pink piece of paper in the same shape. 

Products used:
Fancy Pants Glitter Cuts transparencies
iRock white metal studs
misc flowers and ribbons
white cardstock 
___________________________________

Michele


Inks: Black chalk ink, pigment ink pen and felt pens
Ornaments: Bo Bunny Zoology collection chipboards and stickers, i-rock gems, Maya Road clear ribbon
Tools: Embossing folder and Prima masks 
______________________________________

Virginia


Stickers: Fancy Pants
Jewels: Imaginisce
Felt stickers: Sassafrass Lass
Letters: Basic Grey
Label Stickers: Studio Calico

Monday, June 20, 2011

Design Team Monday

This week brings a technique challenge from the team. 

 Distressing 

The following is a definition I found online....

In scrapbooking and other paper crafts, you often hear the term distressing. If you’re not sure what distressing is, here’s a simple definition. Distressing is a technique used to add an aged look to paper.

Distressing can be done several ways, here are a few techniques:

• Gently rub a distressing ink pad with a sponge (cosmetic sponges work well or use an Antiquing Tool) and rub ink around the edges of paper.

• Brush ink with a direct-to-paper technique (brush ink pad directly onto surface of paper with gentle strokes).

• Set distress embossing powders onto paper.

• Crumple paper, flatten, and rub distress inks on paper. Paper can be sprayed with water and dried with an iron or a heat tool to set.

Any of these techniques will give you an antique or vintage look which can vary with the color and kind of ink you use and how much you apply to the paper. Distressing is a great way to quickly change any layout, altered book, or other paper craft from plain to unique. 

Alright, now let's check out what the ladies did.....

Julie


Bo Bunny papers - Gabrielle
Bo Bunny brads and butterfly embellishments
Bo Bunny chipboard accents
Misc: wire mesh and distressed foil

______________________________________

Michele


Paper: Bo Bunny Timepiece collection, corrugated cardboard
Inks: Pumice Stone and Victorian Velvet Distress inks
Ornaments: Bo Bunny chipboard and trinket, metal key, brads, eyelets and twine, alphabets

____________________________________

Virginia


Supply list:
Patterned paper - Bo Bunny Blast Off
Letter stickers - Basic Grey
Journalling block - Maya Road
Paper embellies - Sassafrass Lass, Glitz Designs
Die cut paper - KI Memories
Border Die - QuicKutz
Lace Ribbon - Spare Parts

__________________________________

Cherie


Paper: Bo Bunny Ad Lib
Stickers: Bo Bunny Ad Lib
Die Cut: Jillibean Soup
Letter Stickers: My Mind's Eye


Monday, May 16, 2011

Design Team Monday!

Monday is here again and that means the team is back for another round of reveals.  This week, is a technique challenge.  It is all about the Embossing!

Julie


Here is a sample of using an embossing folder on cardstock and then highlighting the raised images with ink


This closeup shows an example of using heat embossing on the flag banner. The cardstock was inked and then covered with embossing powder. Using a heat gun to melt the powder gave a shiny silver finish.


Products used for "Stars" layout include:
Bazzil Basics Paper Half the Edge cardstock strips
pom pom trim
BoBunny chipboard circle
Misc letters, small gems and cardstock

__________________________________________

Cherie


Embossed chipboard title:


Cardstock: Bazzill
Chipboard: Best Creations
Die Cuts: Jillibean Soup
Letter Stickers: Basic Grey
Chipboard Title: Maya Road

__________________________________________

Michele

I love embossing!! Since we are featuring just that this week, I used both my Big Shot and my heat gun! I embossed and double embossed several pieces on this LO to show you the different things you can do with both heat and cold embossing and the 2 combined.


Here are detailed photos to better see the embossing. Note here that the background paper (the little bunnies) is already embossed by Best Creations. 


Material Used:
Paper: Best Creations Bunny Love collection and white-pink cardstock
Inks: White, pink and blue pigment ink, enamel embossing powder, Glossy Accent and Crackled Accent
Other: Embossing Folder, EK Success punch
Ornaments: Best Creations chipboards, brads, Bazzill Half The Edge, Bazzill Just the Edge, pompom ribbon, transparent piece and Zva pink bling
__________________________________________

Virginia 


It is difficult to see in the photo but I embossed the border around the photo with a border punch that also embosses.

Supply list:
Patterned paper - Safari Girl by Best Creation
Cardstock - Bo Bunny
Letter Stickers - October Afternoon

____________________________________________

Jenn


I embossed the green card stock on the backgroud of the pictures using a cuttlebug embossing folder. Then I used ink and lightly brushed it over the raised part of embossing. To add a little more definition to the embossed area, I traced the embossing with my Sakura glitter pen.

Products used:
Cuttlebug Embossing Folder
Sakura Glitter Pen
Tim Holtz Distressing Ink - Shabby Shutters
Bazzill Half the Edge - Pink
Pom Pom Trim
Bazzill Card Stock